Appearance
Ease Live Bridge SDK for Roku
This is a guide for developers to get up and running with the Ease Live Bridge SDK for Roku.
Ease Live's main UI engine is HTML5 based. Unfortunately, Roku does not support WebViews or web apps in any way, and all apps on the Roku platform is written in BrightScript. Ease Live solves this on the Roku by rendering the UI using a combination of native SceneGraph components and cloud rendered Ease Live graphics.
Recommended Roku devices
Any Roku model that supports OpenGL ES 2.0. This includes all currently manufactured and supported devices by Roku.
Adding the SDK to your app
The Bridge object contains APIs available for the Ease Live Bridge SDK. In order to initialize the SDK, we need to add the component as a component library to a Scene or a SceneGraph component and load it over the network:
brightscript
m.easeLiveSDK = createObject("roSGNode", "ComponentLibrary")
m.easeLiveSDK.id = "EaseLiveSDK"
m.easeLiveSDK.uri = "https://sdk.easelive.tv/roku/1/easelivesdk.zip"
m.easeLiveSDK.observeField("loadStatus", "onLoadStatusChanged")
m.top.appendChild(m.easeLiveSDK)
Once the loadStatus field of the Ease Live component library changes to ready, we can use it to reference the SDK:
brightscript
function onLoadStatusChanged()
  if m.easeLiveSDK.loadStatus = "ready"
    ' ...
  end if
end function
brightscript
m.easeLive = createObject("roSGNode", "EaseLiveSDK:EaseLive")
m.easeLive.id = "easeLive"
Next up, add the SDK to your SceneGraph layout:
brightscript
m.top.appendChild(m.easeLive)Loading a project
To load an Ease Live overlay, call the load function with the following configuration:
brightscript
m.easeLive.callFunc("load", {
  accountId: "<ID>",
  projectId: "<ID>",
  programId: "<ID>"
})
Required fields
accountId: The shorthand ID for the Ease Live accountprojectId: The UUID for the projectprogramId: The ID for the program. Usually an UUID
Optional fields
env: In your project setting you can configure which Studio URL to load in different environments, such as in prod or staging. If you're not sure, just leave it out and it will selectprodautomatically. Values areprod,stagingordev.version: Specify a project version to load. If you leave it out, the SDK will automatically find the latest project version.
Handling focus
The Roku app should implement handling of moving focus to and from the overlay, and send key events to the overlay while it has focus.
Give focus to Ease Live like this:
brightscript
m.easeLive.setFocus(true)When the user decides to leave the Ease Live overlay, for instance to go back to the video player controls or go out of the video stream entirely, you can listen for this by observing focusChanged:
brightscript
m.easeLive.observeField("focusChanged", "onFocusChanged")brightscript
function onFocusChanged()
  if m.easeLive.focusChanged = "unfocused"
    ' return focus to your own components
  end if
end function
Synchronizing the graphics
Player time
A key feature of Ease Live is the ability to synchronize the overlay graphics with the video. To do this, pick up on timing information in your video player and pass it to Ease Live. The value is represented in unix timestamp, milliseconds since 1st of Jan 1970:
brightscript
m.easeLive.callFunc("setPlayerTime", 1674641327000)Player state
Whenever the player is paused, buffering, seeking or just playing, let Ease Live know about the player state:
brightscript
m.easeLive.callFunc("setPlayerState", "playing")Supported values are: playing,seeking, buffering, paused and stopped.
Bridge messages
Going beyond player synchronization, sometimes it's necessary to communicate back and forth between the OTT app and the Ease Live overlays. Example: A native app button opening up a panel within Ease Live.
The actual event name needs to be decided together with the ones working in Studio setting up the project UI. The name can be anything as long as it's a string, but we recommend prefixing it with app. or <yourProduct>..
Send messages
To send a message to the overlays, use the following syntax.
brightscript
m.easeLive.callFunc("sendMessage", {
  event: "app.myMessage"
})
Receive messages
Listen for messages being sent from the overlays to your app by observing message.
brightscript
m.easelive.observeField("message", "onMessage")

function onMessage(event)
  print event # prints "app.myMessage"
end function
Video scaling
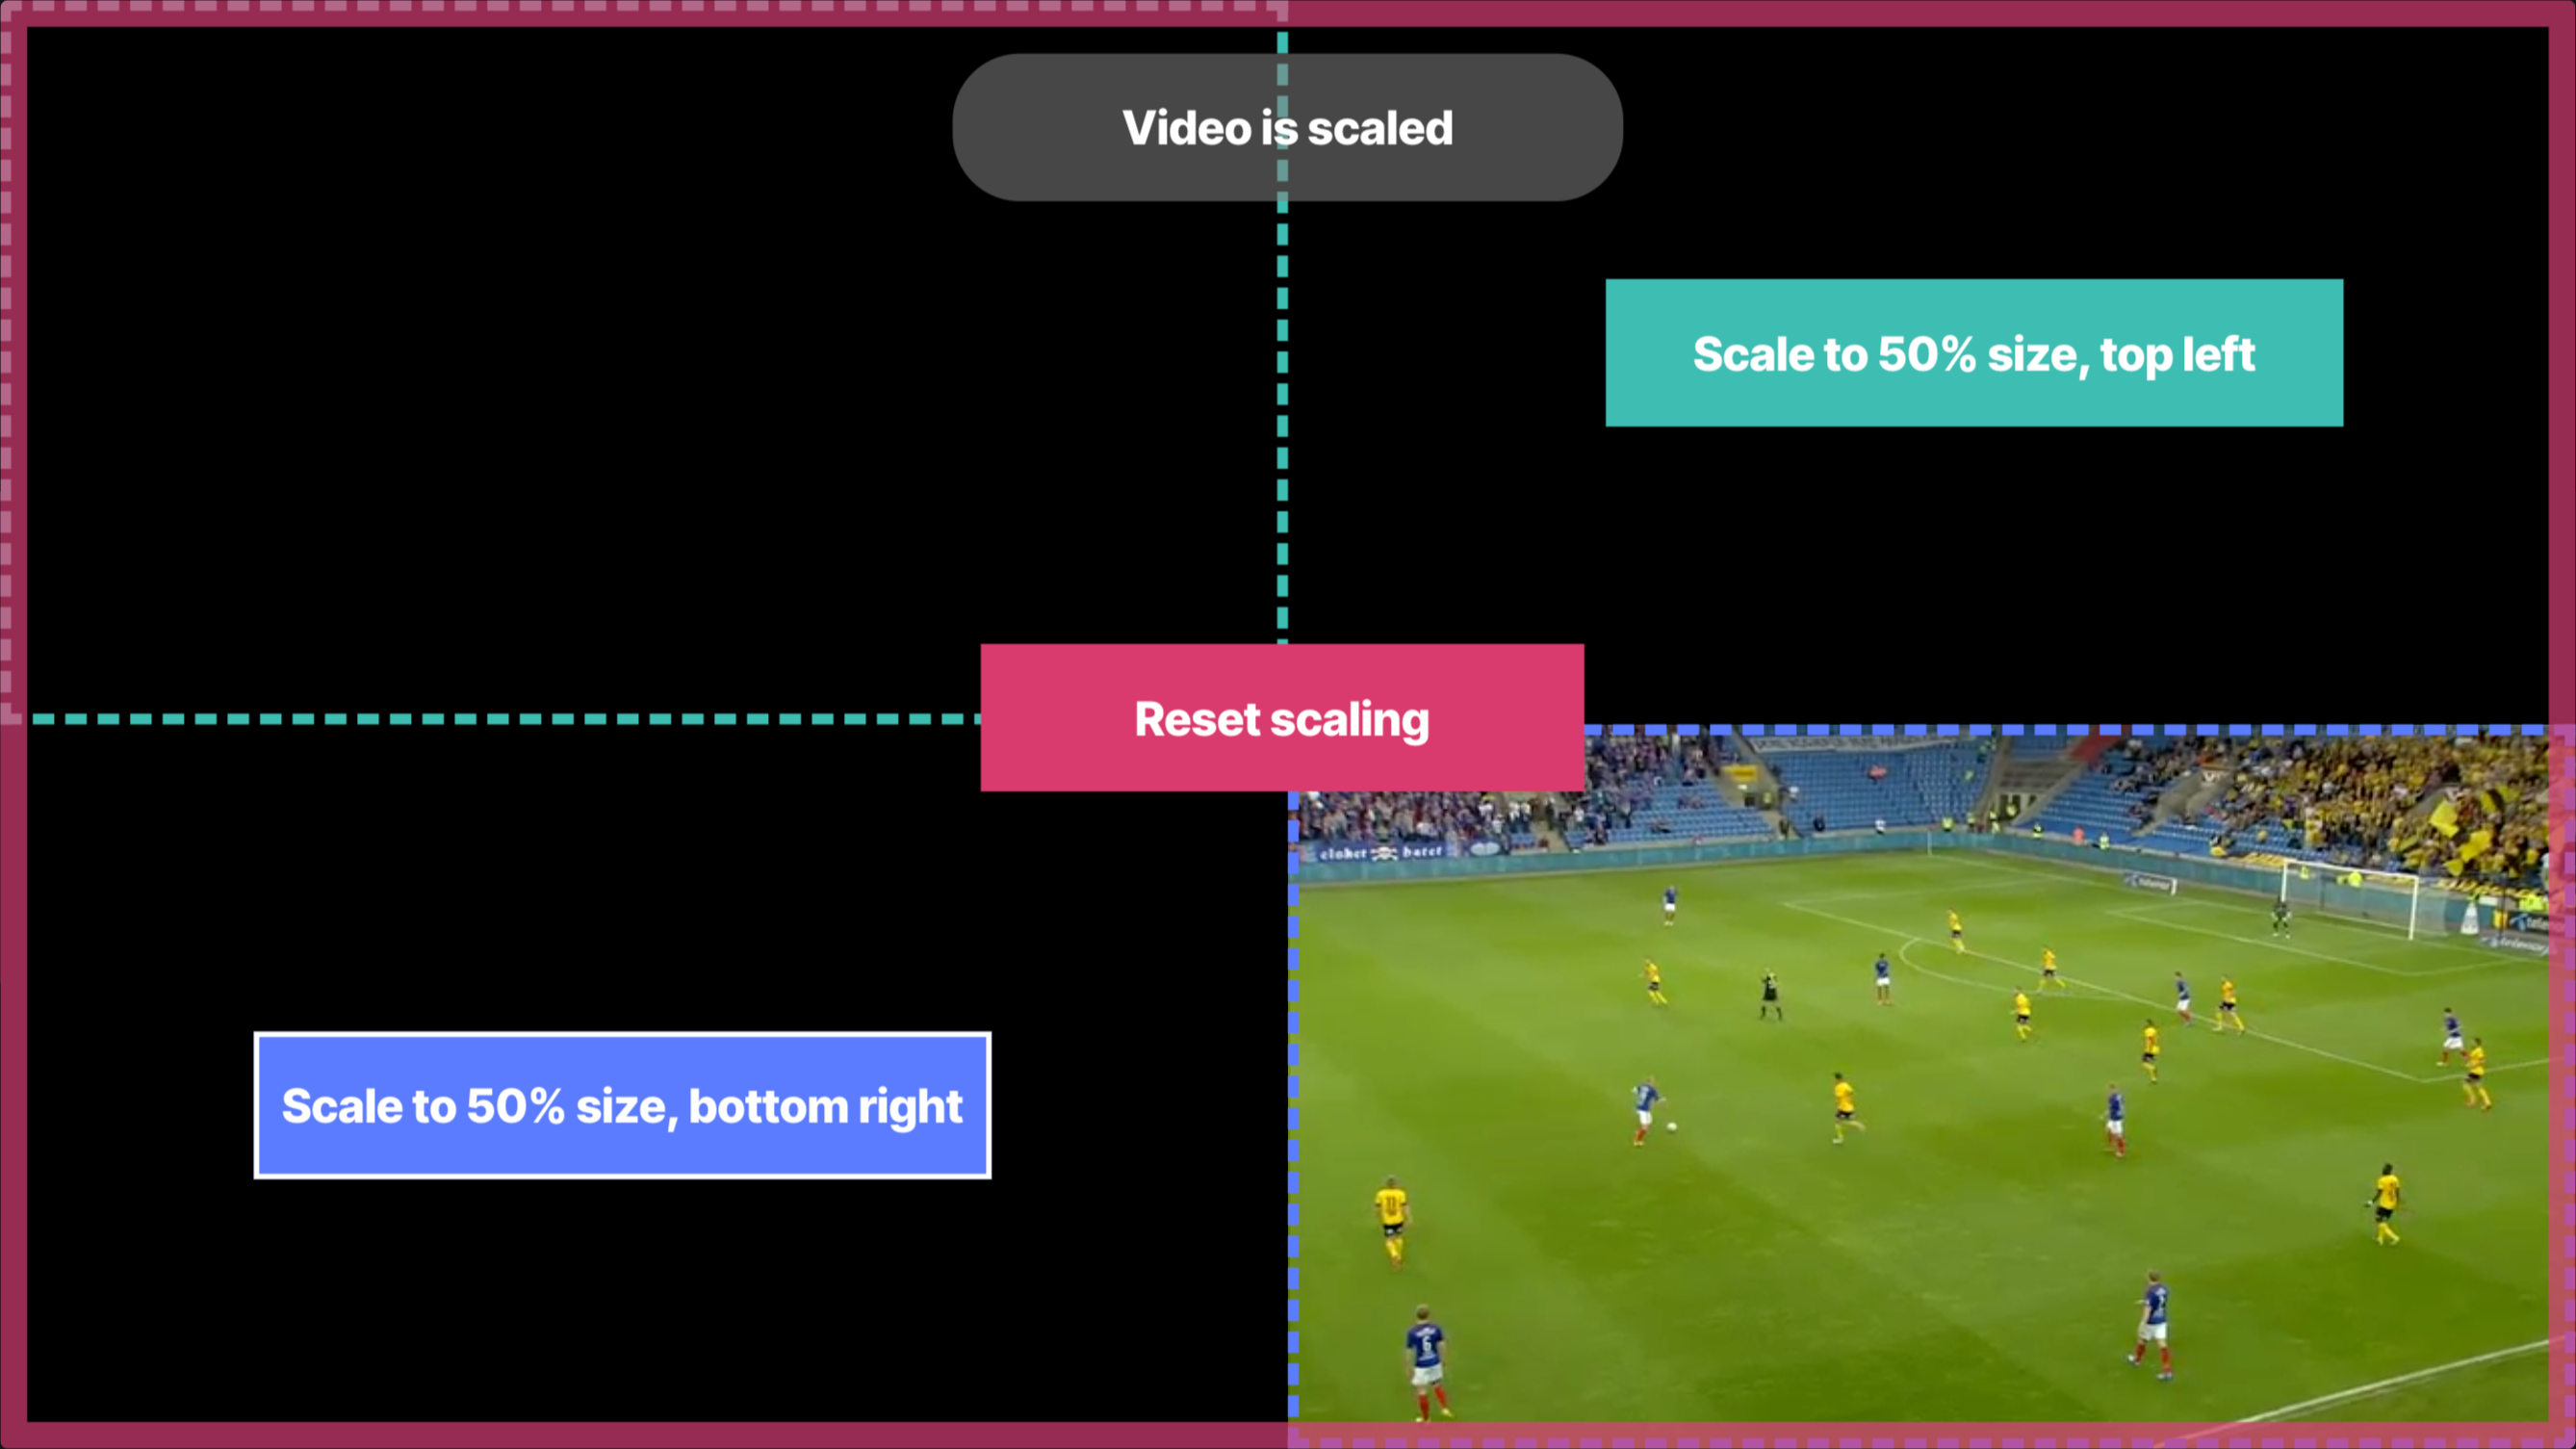
In Studio, you can use the Bridge -> Send video scale action with the intent to resize and move the video player in your Roku app. Ease Live can’t modify the player directly, which is why we offer the onVideoScale event for implementation in your app.
Event metadata
scaleX: Horizontal scale factor, between0and1scaleY: Vertical scale factor, between0and1pivotX: Horizontal anchor for the scaling animation, between0and1pivotY: Vertical anchor for the scaling animation, between0and1duration: Duration of the scale animation in milliseconds, example400(ms)
Code sample
You can use the following code as a reference on how to animate your video player to the values provided in the metadata.
Note
In this example, m.video is the target node. An id is required for the animation to know which node to apply the transformation to.
brightscript
m.easelive.observeField("message", "onMessage")

...

' Handle bridge events
sub onMessage(event)
  payload = event.getData()

  if payload.event = "player.videoscale"
    scaleVideo(payload.metadata)
  end if
end sub

' Initialize video scale
sub initVideoScale()
  if m.videoScale <> invalid then return

  m.videoScale = {
    origin: m.video.boundingRect()
  }

  ' Create animation and interpolator nodes
  m.videoScale.animation = createObject("roSGNode", "Animation")

  ' Scale interpolator
  m.videoScale.scaleInterp = createObject("roSGNode", "Vector2DFieldInterpolator")
  m.videoScale.scaleInterp.setFields({
    key: [0.0, 1.0]
    fieldToInterp: m.video.id + ".scale"
  })
  m.videoScale.animation.appendChild(m.videoScale.scaleInterp)

  ' Pivot point interpolator
  m.videoScale.pivotInterp = createObject("roSGNode", "Vector2DFieldInterpolator")
  m.videoScale.pivotInterp.setFields({
    key: [0.0, 1.0]
    fieldToInterp: m.video.id + ".scaleRotateCenter"
  })
  m.videoScale.animation.appendChild(m.videoScale.pivotInterp)

  m.top.appendChild(m.videoScale.animation)
end sub

' Animate video scale
sub scaleVideo(options)
  initVideoScale()

  ' Scale from and to
  fromScaleX = m.video.scale[0]
  fromScaleY = m.video.scale[1]
  toScaleX = options.scaleX
  toScaleY = options.scaleY

  m.videoScale.scaleInterp.keyValue = [
    [fromScaleX, fromScaleY]
    [toScaleX, toScaleY]
  ]

  ' Pivot from and to
  fromPivotX = m.video.scaleRotateCenter[0]
  fromPivotY = m.video.scaleRotateCenter[1]
  toPivotX = m.videoScale.origin.width * options.pivotX
  toPivotY = m.videoScale.origin.height * options.pivotY

  m.videoScale.pivotInterp.keyValue = [
    [fromPivotX, fromPivotY]
    [toPivotX, toPivotY]
  ]

  ' Update duration and start animating
  m.videoScale.animation.duration = options.duration / 1000
  m.videoScale.animation.control = "start"
end sub
To test your implementation, you can use the example project for video scaling, detailed at the bottom of the page.
Debugging
Enable debug mode to display information about the project, program and player on the screen.
brightscript
m.easeLive.debug = trueWhen debug is off (default), you can also open up the debug panel by by pressing the following combination on the remote:Longpress Left for 5 seconds → Up → Right → Left
Using the shortcut again will close the overlay.
Overriding the shortcut
It is recommended to keep the default shortcut, as users are unlikely to trigger it by accident, as well as having a minimal effect on the interface.
Keeping that in mind, you can override it by adding a line to your manifest file like this:
ease_live_debug_overlay_default_shortcut=...Replace ... with your shortcut in this pattern: key.long+key+key
For example, the default shortcut looks like this: left.long+up+right+left
Alternatively, there's a developer shortcut option that only works while in developer mode:
ease_live_debug_overlay_dev_shortcut=...Find the supported key strings in the official documentation.
Debugging nodes
To enable debugging of nodes, set this in your manifest:
ease_live_debug_nodes=trueThis will render node names, IDs and rectangles around the nodes.
Unload the overlay
To safely remove the overlay from SceneGraph, call the unload function:
brightscript
m.easeLive.callFunc("unload")If you want to be notified when the SDK is done removing itself, observe the statusChanged field for unloaded:
brightscript
m.easeLive.observeField("statusChanged", "onStatusChanged")brightscript
function onStatusChanged()
  if m.easeLive.statusChanged = "unloaded"
    ' ...
  end if
end function
SDK status
By observing statusChanged you will know which state the SDK is in. Available states are:
loading: The SDK is currently loading in the project, graphics and dataunloaded: The SDK has finished tearing down the UIready: The SDK and overlay is all setup and is ready to be usedfailed: Something went wrong and you should remove the SDK from the scene
Project and program status
The project and program that is loaded into the app, can be visible or hidden based on settings. These can be changed during runtime. Example: Something goes wrong during a game and you want to hide the graphics for everyone already watching.
brightscript
m.easeLive.observeField("appStatusChanged", "onAppStatusChanged")brightscript
function onAppStatusChanged()
  if m.easeLive.appStatusChanged = "disabled"
    ' ... unload the overlays
  end if
end functionenabled: The overlay is running normally and is displayed on screenhidden: The overlay is loaded in, but the graphics are hidden. They can be turned on/off in project and program settings. Whenever the graphics are hidden, focus is given back to the appdisabled: The project or program is disabled, and you should likely unload the entire SDK
Error handling
If something critical happens and the SDK isn't able to handle it, the error event is triggered. Observe it to make sure you can catch the error and remove the overlay:
brightscript
m.easeLive.observeField("error", "onError")brightscript
function onError(e)
  print e.message
end function
TIP
If an error is thrown, m.easeLive.statusChanged will also be set to failed.
Initial load timeout error
If it takes more than 20 seconds to load the overlays, it means the Bridge hasn't received any data from the API. statusChanged will be set to failed and the following error event will be triggered:
{
  message: "Application load timed out after 20 seconds"
}
Example project UIs
Since the graphics are synced to time, remember to send in timecodes when loading the example UIs. If you haven't integrated player time in your project yet, just pass in device realtime once, like this:
brightscript
timecode = createObject("roDateTime").asSeconds() * 1000
m.easeLive.callFunc("setPlayerTime", timecode)
Use the following BrightScript code to load the overlays:
brightscript
m.easeLive.callFunc("load", {
  accountId: "<ID>",
  projectId: "<ID>",
  programId: "<ID>"
})
Baseball UI example
This project shows a full main menu for a game experience with sub panels behind each menu option.
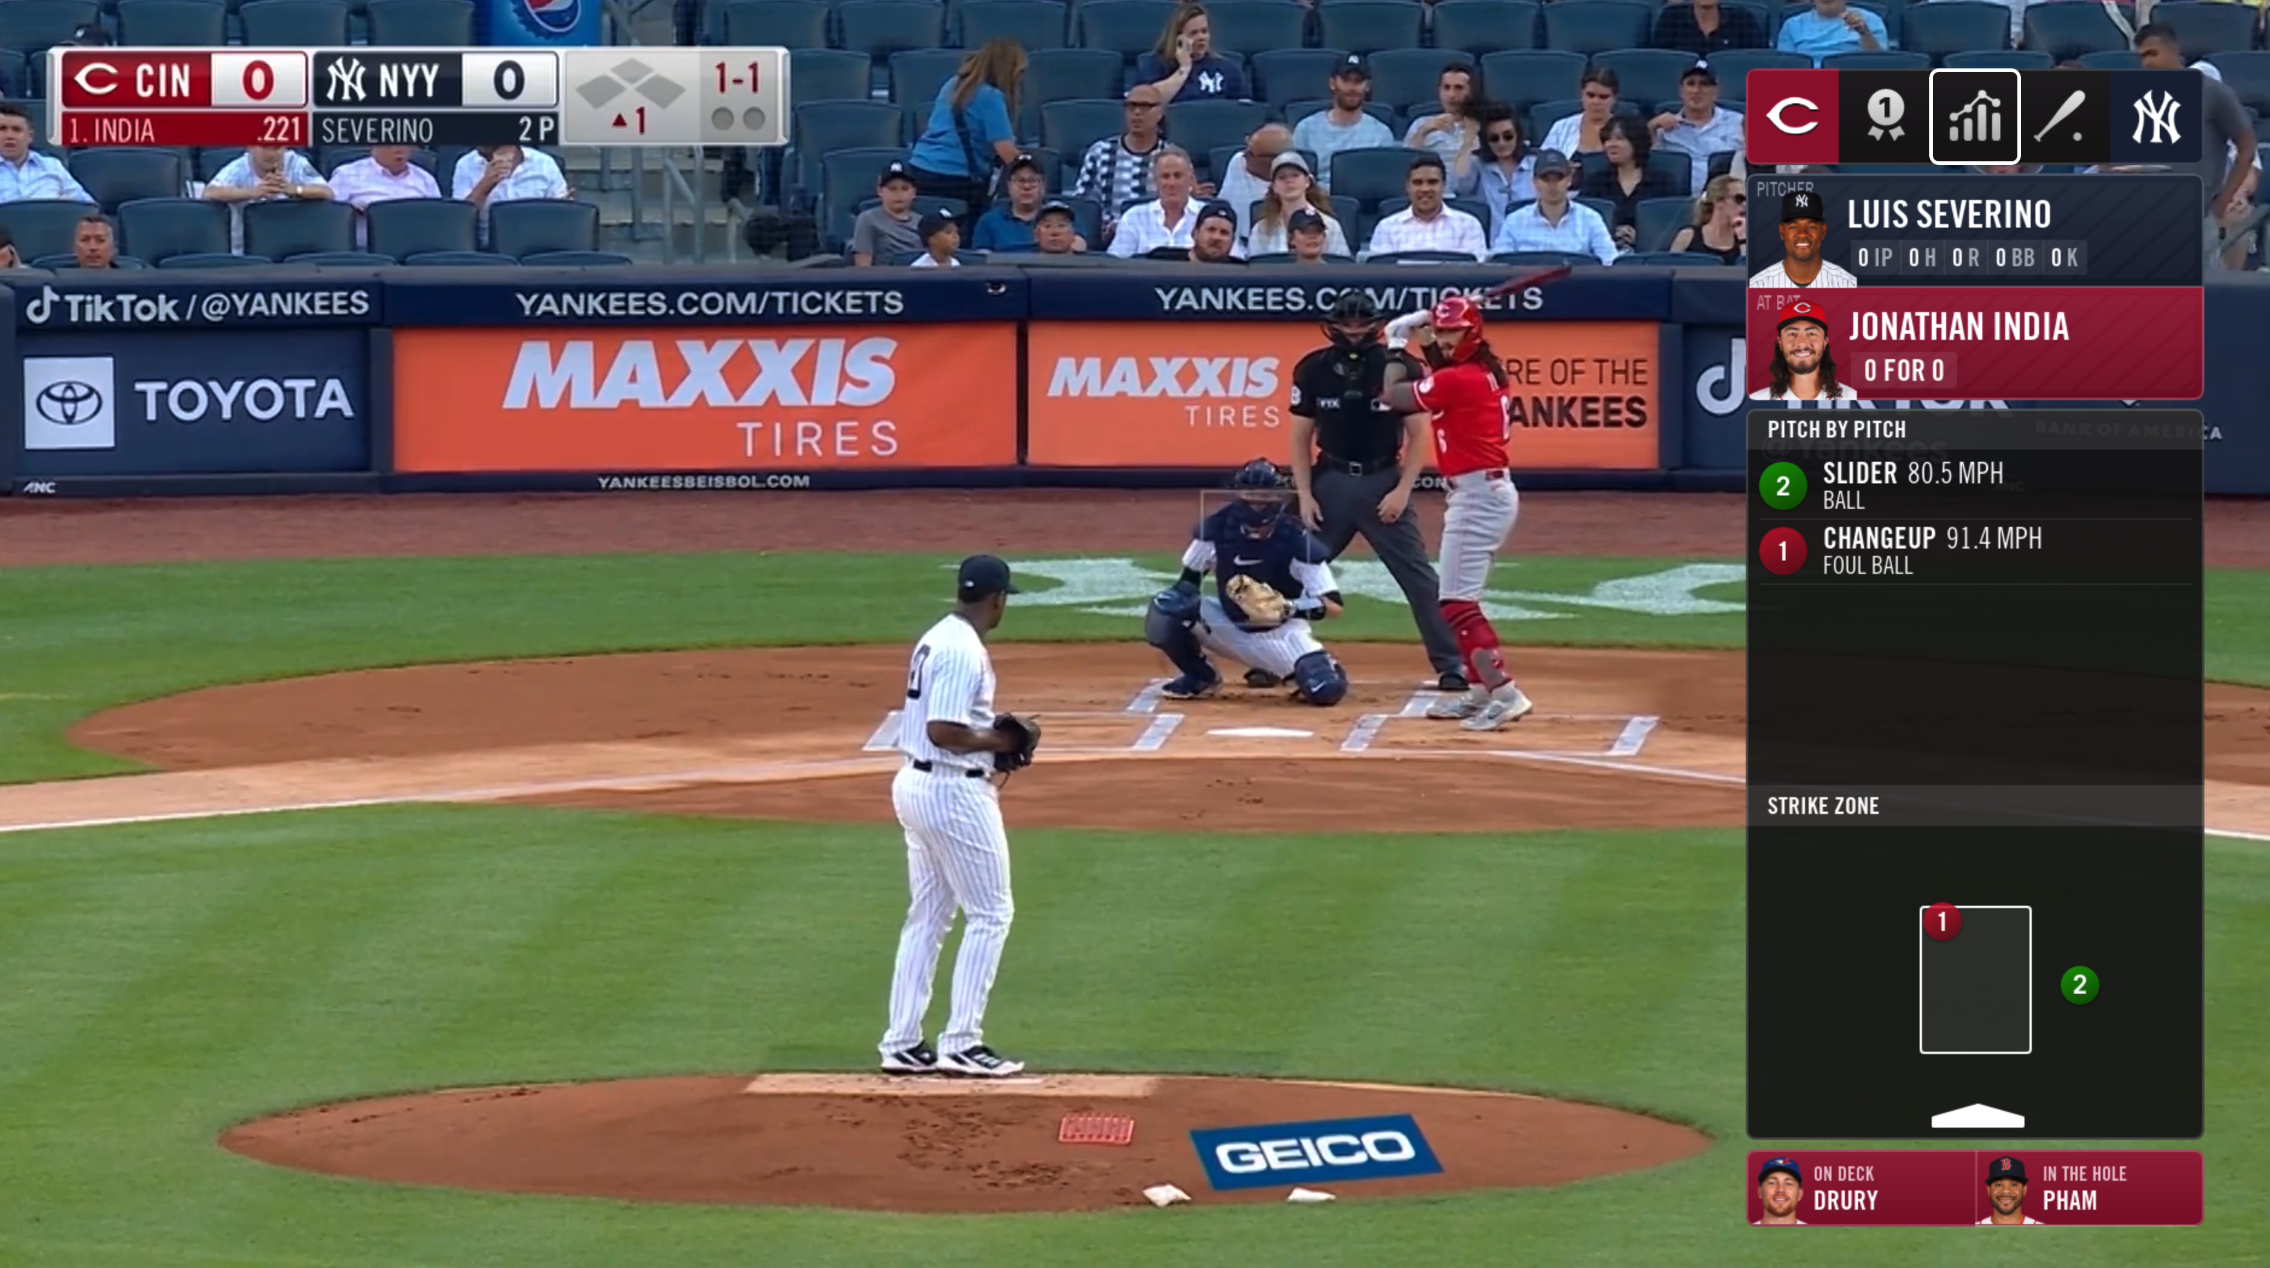
accountId:tutorialsprojectId:580e5ba1-423d-4c17-9a86-08b75e88bb7eprogramId:cloud-capture-demo
Video scale UI example
This project is useful when implementing the video scale feature. It will help you confirm resizing, positioning and animation of the video player.
accountId:tutorialsprojectId:1e047bdd-564f-4072-ab7c-eb68bcc1a5deprogramId:78a769c0-1791-4fd6-8f57-b15db003a1a3