Appearance
Ease Live Bridge iOS SDK
This is a guide for customers/developers to get up and running with the Ease Live Bridge SDK for iOS.
Customers that have a native app and want to integrate it with Ease Live need a convenient way to do so. They may have their own player or a specific player they want to use. Players generally have a custom way of reading timecodes from their streams. With the Ease Live Bridge SDK the customer can do this the easiest and fastest way possible.
Requirements
- iOS 13.0 or newer
- tvOS 13.0 or newer
- visionOS 1.0 or newer
- Xcode 16.0 or newer
- Swift 6.0 toolchain with Swift 5 or 6 language version
Architecture

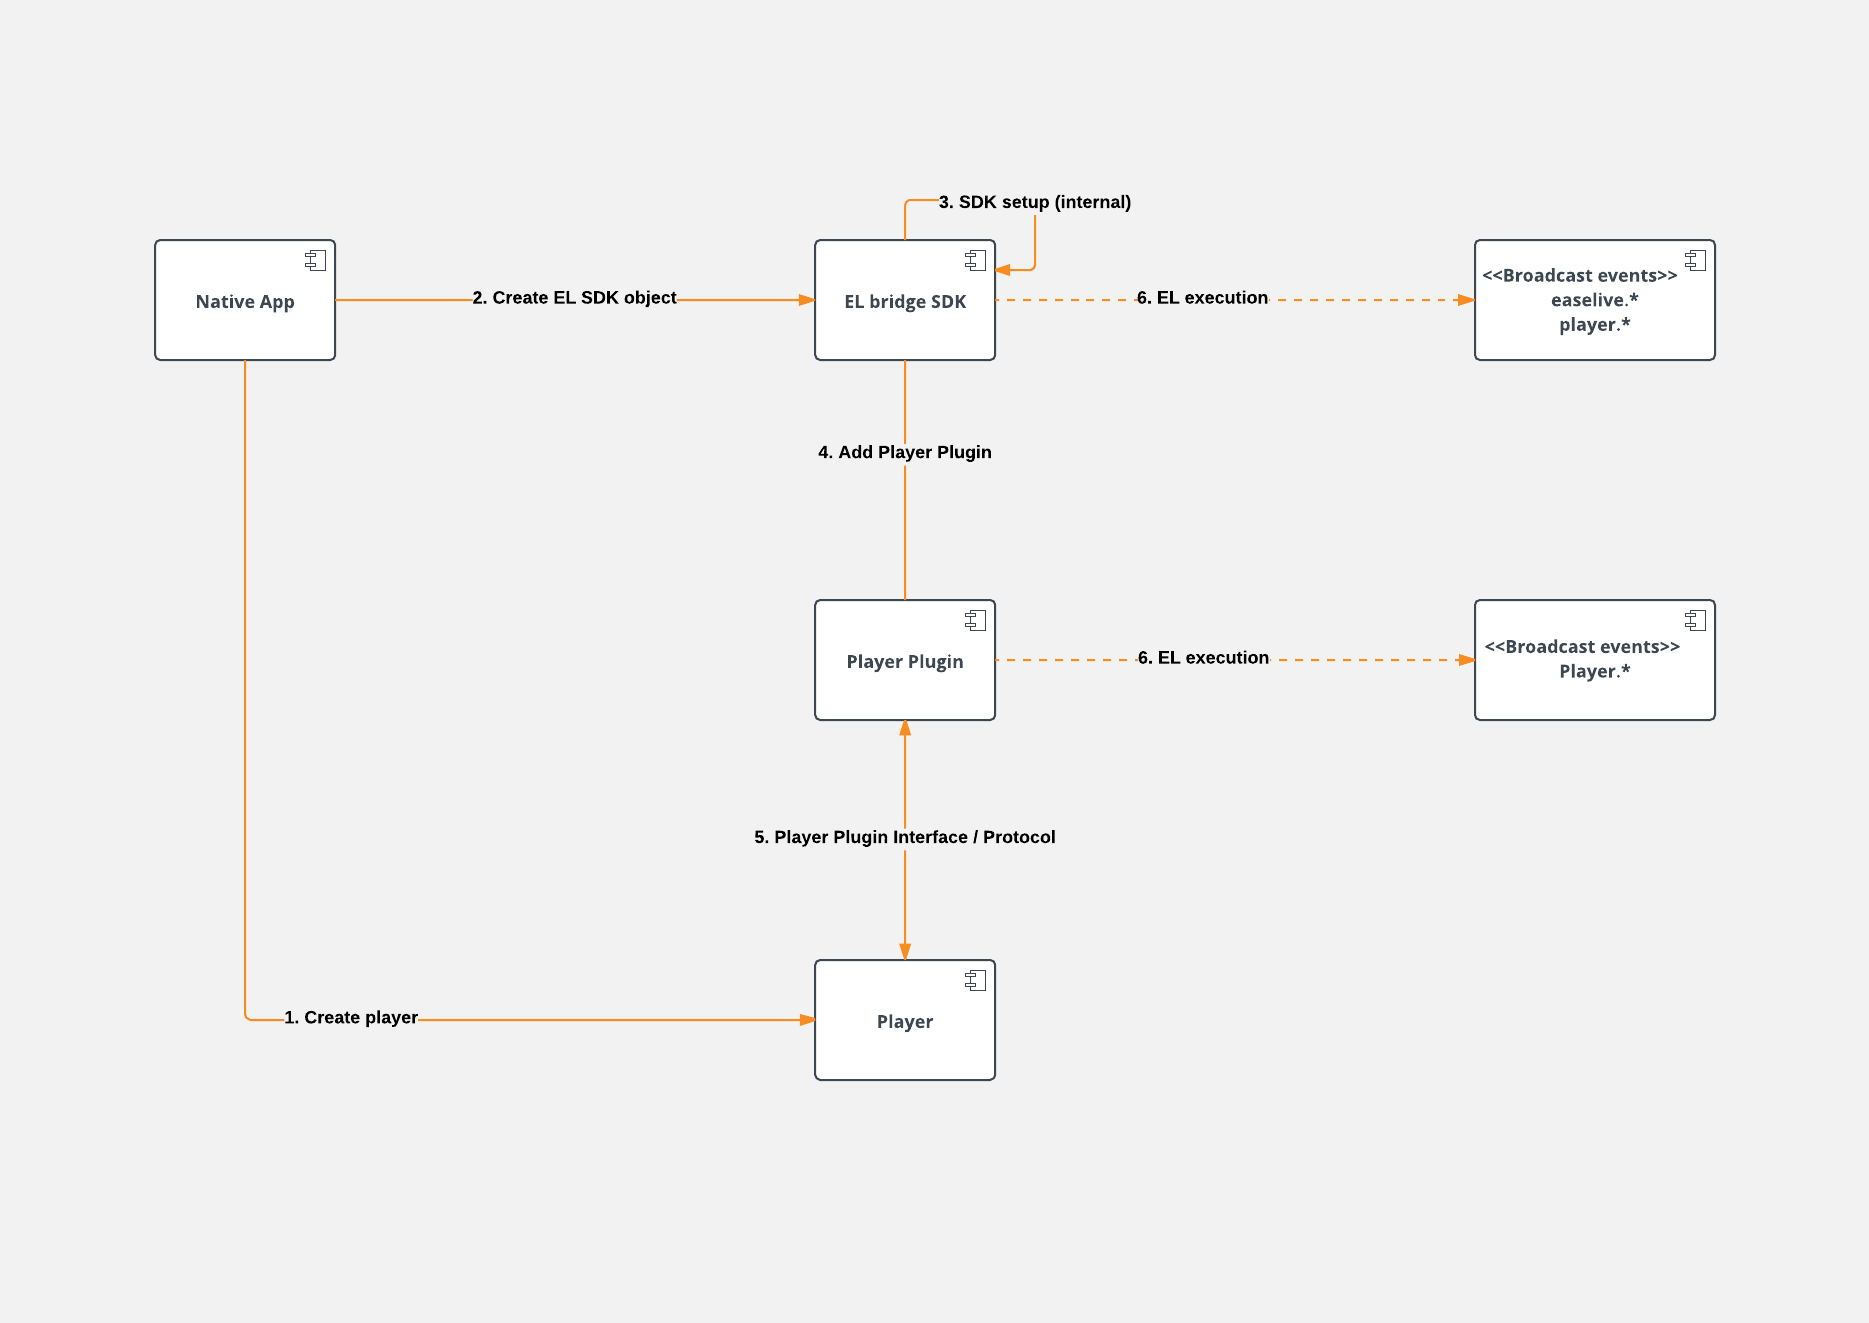
The main components in the SDK are:
- EaseLive bridge SDK: responsible for
- loading the EaseLive url into a proper View
- create the communication layer between the Player and the EL web app
- handle EL SDK lifecycle
- Player: responsible for the playback and for reading the metadata that the stream includes.
- PlayerPlugin: responsible for the communication between the EL SDK and the player.
SDK and example project
Download the SDK and example project
Get started
Swift Package Manager
- In the project navigator, select the project
- In the project editor, select the project
- In the Package Dependencies pane, Add Package Dependency
- Enter URL
https://github.com/ease-live/ease-live-bridge-ios-spm.git - Add EaseLiveSDK package
Cocoapod
- run
pod repo add ease-live-bridge-ios-pod https://github.com/ease-live/ease-live-bridge-ios-pod - modify your podfile with the following changed:
- be sure of having
use_frameworks!in the podfile - add the source
source 'https://github.com/ease-live/ease-live-bridge-ios-pod.git' - add the statement
pod 'EaseLiveSDK', it's also possible to specify the version adding, '~> 2.20.0'as a parameter
- be sure of having
- run
pod install - open the .xcworkspace file
Manual install
- In the project navigator, select the project
- In the project editor, select the app target
- In the General pane, drag and drop
EaseLiveSDK.xcframeworkinto the Frameworks, Libraries, and Embedded Content list
The EaseLive instance
Every Ease Live Bridge application starts by creating a new EaseLive instance with one of the constructor functions. The initialization of the EaseLive bridge will start when the create() method is called on the EaseLive object.
Swift
import EaseLiveSDK

easeLive = EaseLive(parentView: easeLiveView, // view in which the Ease Live overlay will render
                     // project and environment to load
                     accountId: "tutorials",
                     projectId: "0346ae3e-7a91-4760-bcd3-cd84bb6790dd",
                     programId: "2d2711ff-6ff2-41c1-a141-060e9ffa2c38",
                     env: "prod",
                     // Optional Stream ID used for timecode settings. Defaults to "main"
                     streamId: "stream-1",
                     // optional query parameters added to the URL loaded from the environment
                     params: [
                        "customValue": 1
                     ],
                     playerPlugin: playerPlugin)
The values in the code above will load in an SDK installation UI that will help to verify your implementation.
By default the available environments are: "prod", "staging" and "dev". Environments can be configured in project settings.
See PlayerPlugin for implementation of a plugin for a custom player.
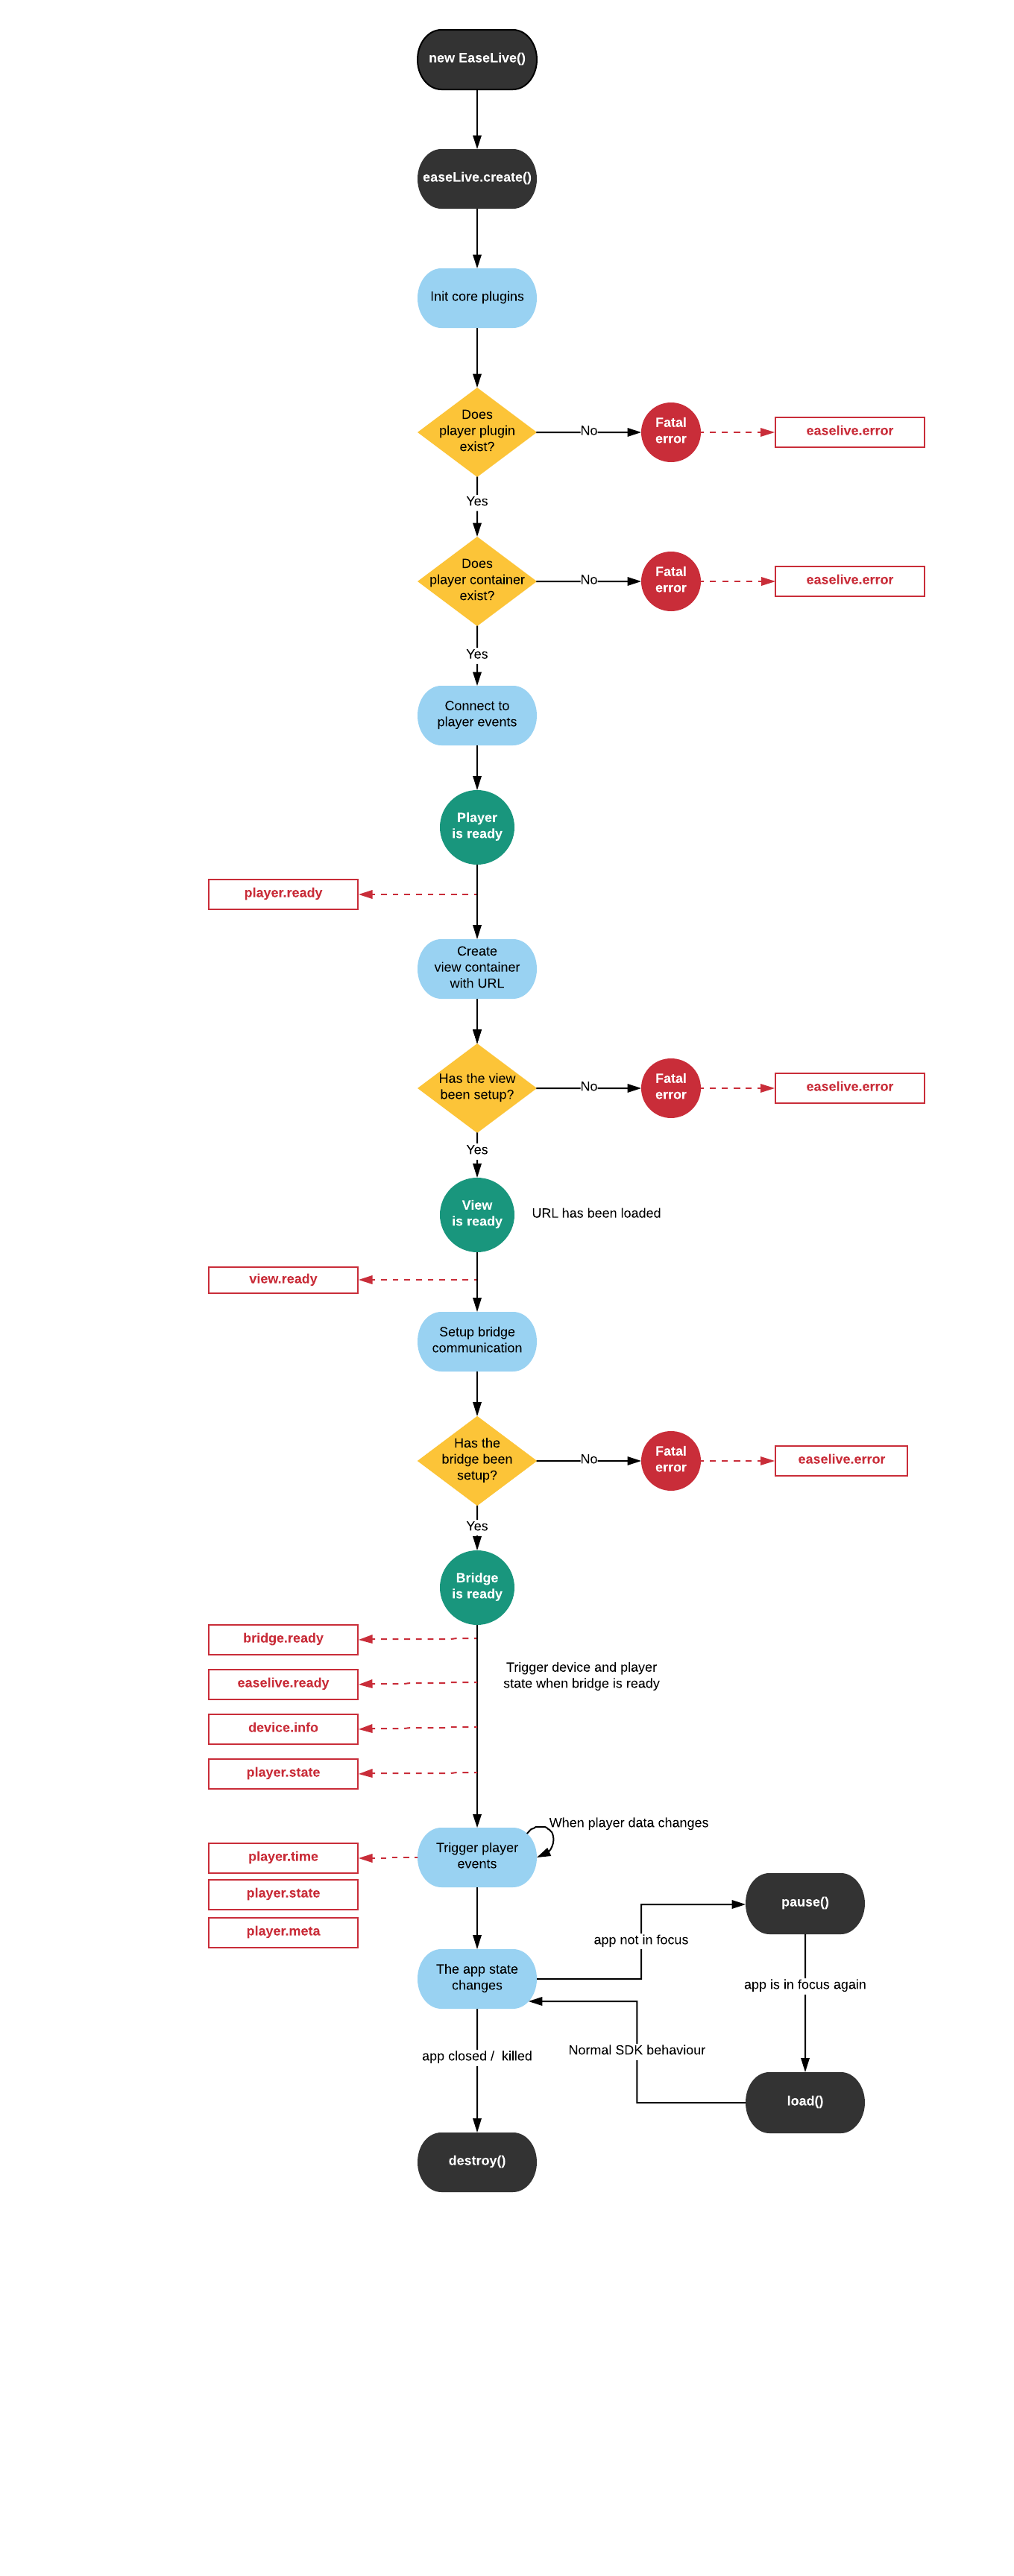
Lifecycle diagram

Create
The method EaseLive#create() should be called when the EL SDK need to be created and to initialise any object needed by the plugins.
Create should usually be called from viewDidLoad in your UIViewController.
Load
The method EaseLive#load() should be called on the EL SDK object when the app need to start executing its internal behaviour. For example a PlayerPlugin should call load to start loading the url where the video stream is located.
Load should usually be called from viewWillAppear in your UIViewController.
Pause
The method EaseLive#pause() should be called on the EL SDK object when the app goes in foreground, so when it's not visible but not in focus anymore.
Pause should usually be called from viewWillDisappear in your UIViewController.
Destroy
The method EaseLive#destroy() should be called when the app goes in background or the app is destroyed. This method takes care of calling the destroy method on each of the plugins, and this method takes care of removing the objects and listeners safely.
Destroy should usually be called from deinit in your UIViewController.
Change program
The method EaseLive#setProgram(projectId: String?, programId: String, env: String?, params: [String: Any]?) can be called when the app wants to change the loaded program in the current EaseLive instance. The typical case to use this is when the app loads a new video stream in the current video player or a different program starts in the current stream.
Change stream
If the video stream changes during a program, stream ID can be changed using EaseLive#setStreamId(_ streamId: String?) to apply timecode settings for the stream.
Error handling
Errors from the SDK are broadcast with the notification EaseLiveNotificationKeys.easeLiveError. The error object can be retreived from the EaseLiveNotificationKeys.errorUserInfoKey key of the notifications userInfo parameter. The error object contains information about the error level ( fatal or warning) and a string value with the verbose reason for the error.
When the SDK experiences a fatal error, the SDK should be removed from the app calling easeLive.destroy() that takes care of removing EaseLive correctly from memory.
Swift
NotificationCenter.default.addObserver(self, selector: #selector(onEaseLiveError(notification:)),
                                             name: EaseLiveNotificationKeys.easeLiveError,
                                             object: nil)

@objc func onEaseLiveError(notification: Notification) {
    if let error = notification.userInfo?[EaseLiveNotificationKeys.errorUserInfoKey] as? EaseLiveError {
        if error.level == .fatal {
            self.easeLive?.destroy()
            self.easeLive = nil
        }
    }
}
Status handling
Listen for change in status of the loaded overlay, which can change during runtime.
If the status is "disabled" the EaseLive instance can be destroyed.
If the status is "hidden" or "disabled", when used on TV, the focus should be moved to player controls.
Swift
NotificationCenter.default.addObserver(self, selector: #selector(onEaseLiveAppStatus(notification:)),
                                             name: EaseLiveNotificationKeys.bridgeAppStatus,
                                             object: nil)

@objc func onEaseLiveAppStatus(notification: Notification) {
    if let status = notification.userInfo?[EaseLiveNotificationKeys.statusUserInfoKey] as? String {
        if status == "disabled" {
            easeLive?.destroy()
            easeLive = nil
            easeLiveView?.isHidden = true
        } else if status == "hidden" {
            easeLiveView?.isHidden = true
        } else if status == "enabled" {
            easeLiveView?.isHidden = false
        }
        #if os(tvOS)
        // move focus out of EL if it was hidden, and focus your player controls
        setNeedsFocusUpdate()
        updateFocusIfNeeded()
        #endif
    }
});
Components
The SDK contains a few default components and plugins needed to have a fully working EaseLive instance. To allow the communication between those components, events are sent as notifications. Any additional plugins can communicate with the default components using those events.
Event dispatcher
See Events for a list of events that are emitted by the SDK and plugins.
EaseLive SDK
The EaseLive instance is responsible of calling lifecycle methods and to send the messages related to any error sent to the SDK so that the player and the app can update accordingly. Furthermore the SDK sends some messages from the UI overlay web app to the app so that the player knows when the web app want it to change state or other settings.
Player plugin
The player plugin handles the communication between the player and the EaseLive SDK. See PlayerPlugin for implementation details.
View plugin
The view plugin is used to display the overlay UI. The default implementation uses a webview to display the UI.
Bridge plugin
The bridge plugin is used to send events between the plugins and the overlay UI.
Custom plugins
Plugins can add additional functionality to the EaseLive instance. There is no strictly defined scope for a plugin, however it is usually used for adding extra functionality to the bridge by adding listeners to the lifecycle events. This is achieved by creating a class implementing the ComponentInterface and registering it using easeLive.use(plugin: ComponentInterface) before calling easeLive.create().
Widget plugin
Can be used to embed native UI inside the overlay. See Widget for implementation details.
Custom bridge messages
Custom messages can be used to send data from the app to the Ease Live overlay, and to receive data from the overlay. This can be used for custom functionality in the overlay.
Sending a message to the overlay
Swift
let jsonObject = [
    "event": "myPrefix.myEvent",
    "metadata": [
        "myCustomValue": "some data"
    ]
] as [String: Any]
let jsonData = try JSONSerialization.data(withJSONObject: jsonObject)
guard let jsonString = String(data: jsonData, encoding: .utf8) else { return }

NotificationCenter.default.post(name: EaseLiveNotificationKeys.appMessage, object: nil, userInfo: [
    EaseLiveNotificationKeys.jsonStringUserInfoKey: jsonString
])
To receive this message in the overlay configure a "Bridge message is received" trigger on the Bridge data source in the Studio project.
Receiving a message from the overlay
A message can be sent from the overlay by configuring a "Send bridge message" trigger in the Studio project.
Such messages can be received in the app by listening for it:
Swift
override func viewDidLoad() {
    super.viewDidLoad()

    NotificationCenter.default.addObserver(self, selector: #selector(onBridgeMessage(notification:)), name: EaseLiveNotificationKeys.bridgeMessage, object: nil)

    ...
}

@objc func onBridgeMessage(notification: Notification) {
    guard let jsonString = notification.userInfo?[EaseLiveNotificationKeys.jsonStringUserInfoKey] as? String else { return }
    guard jsonString.contains("myPrefix.") else { return }
    do {
        guard let json = try JSONSerialization.jsonObject(with: Data(jsonString.utf8)) as? [String: Any] else { return }
        if let event = json["event"] as? String {
            if event == "myPrefix.myEvent" {
                if let metadata = json["metadata"] as? [String: Any] {
                    if let myCustomValue = metadata["myCustomValue"] as? String {
                        print("myCustomValue", myCustomValue)
                    }
                }
            }
        }
    } catch {
    }
}
Google ads
iOS
Follow instructions on WebView API for Ads to add Google Mobile Ads SDK to your app.
Instead of the steps for adding and registering a new WebView, register the WebView that is created by EaseLive:
Swift
override func viewDidLoad() {
    super.viewDidLoad()

    // listen for EaseLive creating a webview
    NotificationCenter.default.addObserver(self,
        selector: #selector(onEaseLiveViewCreated(notification:)),
        name: EaseLiveNotificationKeys.viewCreated,
        object: nil)

    // rest of the EaseLive setup
}

// EaseLive has created a webview. Register it with the Google ads instance
@objc func onEaseLiveViewCreated(notification: Notification) {
    if let webView = easeLive?.viewPlugin?.view() as? WKWebView {
        GADMobileAds.sharedInstance().register(webView)
    }
}
tvOS
On tvOS the ad is loaded using tagless request, so not all Ad Manager features can be used. Contact us for more info on ad setup.
Advertising identifier
If your ad requires resettable device identifier for tracking, the app can pass the advertising identifier as a String in params with key advertisingIdentifier to the EaseLive constructor, and it will be included as rdid query parameter in the tagless request.
Swift
// request user's permission for tracking
if ATTrackingManager.trackingAuthorizationStatus == .notDetermined {
    await ATTrackingManager.requestTrackingAuthorization()
}

// pass advertisingIdentifier in EaseLive params
let adId = ASIdentifierManager.shared().advertisingIdentifier.uuidString
self.easeLive = EaseLive(parentView:accountId:projectId:programId:
    params: ["advertisingIdentifier": adId],
    playerPlugin: ...
)
Custom ad targeting parameters
Pass dictionary of parameters in customAdTargeting to the constructor:
Swift
self.easeLive = EaseLive(parentView:accountId:projectId:programId:params:
    customAdTargeting: [
        "account.propName": "some-id"
    ],
    playerPlugin: ...
)
To change parameters during runtime call:
Swift
self.easeLive.setCustomAdTargeting([
  "account.propName": "new-id",
  "account.newProp": "123"
])
TvOS
For use on Apple TV the EaseLive instance makes available the property preferredFocusEnvironments. This can be used in the view controller to move focus to the overlay.
Example for showing and moving focus to the EaseLive overlay when the player controls are hidden:
Swift
class ViewController: UIViewController {
    var playerView: PlayerView?
    var easeLive: EaseLive?

    // when player controls are hidden the EaseLive overlay takes focus
    override var preferredFocusEnvironments: [UIFocusEnvironment] {
        if !playerView.areControlsShown {
            return easeLive.preferredFocusEnvironments
        }

        return super.preferredFocusEnvironments
    }

    // listen for changes in the player controls visibility
    func onControlsHide(_ event: ControlsHideEvent, view: PlayerView) {
        // show the EL overlay when player controls are hidden
        easeLiveView?.isHidden = false
        easeLivePlayerPlugin?.onControllerVisibilityChanged(visible: false)

        // focus update will use preferredFocusEnvironments to focus EaseLive
        setNeedsFocusUpdate()
    }

    func onControlsShow(_ event: ControlsShowEvent, view: PlayerView) {
        // hide the EL overlay when player controls are visible
        easeLiveView?.isHidden = true
        easeLivePlayerPlugin?.onControllerVisibilityChanged(visible: true)

        // focus update will use preferredFocusEnvironments to focus player controls
        setNeedsFocusUpdate()
    }
}